How to fix RDP printing problem

You might see it spool on the server then disappear or the job never gets back to the client.

 
1. Click Start, search for cmd.exe

2. Right click on cmd.exe

3. Click on ‘Run as Administrator’

4. Type “C:\” w/o the quotation marks and then Press Enter.

5. Type CD\Windows\System32\Spool and then Press Enter.

6. Type Cacls.exe PRINTERS /e /g users:C and then Press Enter.

7. Restart the computer

http://support.microsoft.com/kb/968605

How to recover deleted emails from a pst file

Recovery process

The recovery process requires a Hex Editor. For the screenshots below, I’ve used HxD which is free and comes in many languages. There is also a portable version of HxD which doesn’t require any local installation. There are many other Hex Editors to choose from as well.

  1. Locate the *.pst file and create a copy of it to work with (never mess around with original files!)
  2. Open the *.pst file in the hexadecimal editor of your choice.
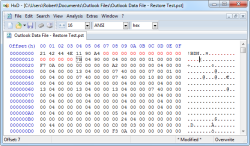
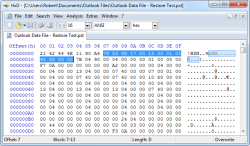
  3. In the column on the right side overwrite character position 7 through 13 with spaces. In the hexadecimal numbering system, this corresponds to 13 positions and not 6.
    When done correctly, the hexadecimal column (left column) block 7 through 13 will then display 20 (hexadecimal value for a space).

    Tip!
    If you are using HxD, then you can also select block 7 through 13 in the left column and choose;
    Edit-> Fill Selection…-> button OK
    This will fill the blocks with 00, which will work just as well.

    pst-file before editing in HxD (click on image to enlarge) pst-file after editing in HxD (click on image to enlarge)
    Before and after examples of editing position 7 through 13 of the pst-file in HxD.
    (click on images to enlarge)
  4. Save the *.pst file and close the Hex Editor.
  5. As you have now corrupted your pst file, you’ll need to run scanpst.exe to repair it.
  6. When scanpst.exe has repaired your pst file, open it in Outlook and look in the Deleted Items folder or in the original folder to locate your recovered items.

http://www.howto-outlook.com/howto/restoredeleteditemsfromanoutlookpst.htm

How to change License number and product number in QuickBooks

  1. Browse to the location of the QuickBooks Common Files folder.
    • Windows 7 or Vista: C\ProgramData\Common Files\Intuit\QuickBooks
    • Windows XP: C:\Documents and Settings\All Users\Application Data\COMMON FILES\INTUIT\QUICKBOOKS.
  2. Locate and double-click on the qbregistration.dat file.
  3. A Caution window will be displayed with the following message “You are attempting to open a file of type “Dat File” (.dat)”. Click the Open With button below the message.
  4. A Windows box will be displayed with the following message, “Windows cannot open this file.” Choose Select Program for a List and click OK.
  5. Select Notepad and click OK to open the file. You may need to scroll through the Other Programs section if Notepad is not listed as a Recommended program.
  6. Before editing the qbregistration.dat file, you may want to make a copy. Select File>Save As and use the drop-down arrow from the Save In window to select the desktop. Click Save.
  7. Now Notepad will show installed QuickBooks product. The following indicate the versions and editions of the installed programs.
    • VERSION number= “17.0” (2007) or “18.0” (2008).
    • FLAVOR name=”QuickBooks Simple Start =atom, QuickBooks Pro=pro, QuickBooks Premier (not Accountant Edition) = superpro, QuickBooks Premier Accountant Edition=accountant, Enterprise Solutions = bel, Enterprise Solutions Accountant Edition=belacct.
  8. Locate the version of QuickBooks that was installed with the incorrect license number or product code.
  9. Replace InstallID with the correct product code. Use the following format when you enter the numbers: 000-000. Do no remove any of the brackets.
  10. Replace LicenseNumber with the correct license number. Use the following format when you enter the numbers: 0000-0000-0000-000. Do not remove any brackets.
  11. Select File>Save.
  12. Restart the computer.
  13. Launch QuickBooks. Verify that the changes have been made by selecting CTRL +1 to display the Product Information window.

http://support18.quickbooks.intuit.com/support/articles/how12493

How to delete items from internet explorer history

1.Close any open windows or programs
2.Click Start
3.Click Run
4.Type: regedit
5.WARNING: Registry editing is for experienced computer users only. Mistakes made in the registry can render your computer and Windows useless. Proceed at your own risk.
6.Click the “+” sign next to HKEY_CURRENT_USER
7.Click the “+” sign next to Software
8.Click the “+” sign next to Microsoft
9.Click the “+” sign next to Internet Explorer
10.Click TypedURLs
11.Delete all the URLx (e.g. URL1, URL2 and so on) that you do NOT want to see in the address bar
12.Close the registry editor.

http://helpmerick.com/delete-only-one-entry-from-internet-explorer-address-bar-history-video-tip.htm

Location tab missing from MyDocuments Windows 7

You can change the path through a registry edit:

HKEY_CURRENT_USER\Software\Microsoft\Windows\Curre ntVersion\Explorer\Shell Folders
The Personal value is the path to My Documents

HKEY_CURRENT_USER\Software\Microsoft\Windows\Curre ntVersion\Explorer\User Shell Folders
Again, the Personal value is the path to My Documents

The “Shell Folders” key is obsolete. Make alteration in the “User Shell Folders” key instead. Set “Personal” to “%USERPROFILE%\Documents”

How to create bootable USB

http://www.intowindows.com/bootable-usb/

Guide to making a bootable USB drive using Vista or Windows 7
(Note: this guide will not work on WinXP.)
1. Insert your USB stick into USB port (MUST be 4GB or higher).
(Note: Backup the data on your USB drive as we are going to format it.)
2. Open the Command Prompt: (follow steps listed below to do this)
Go to Start Menu >
All programs >
Accessories >
Right click on ‘Command Prompt’
Select ‘Run as Administrator’
3. When the Command Prompt opens, enter the following command:
DISKPART (hit enter)
LIST DISK (hit enter)
(Note: Once you enter the LIST DISK command, it will show the disk numbers of all drives connected to your PC)
4. In this step, enter all the below commands one by one and hit enter:
SELECT DISK 1 (Replace “DISK 1″ with your USB drive’s disk number, For example: If your usb is 4GB,
and Disk 2 shows 4000mb disk size, type SELECT DISK 2, as that is your usb drive)
CLEAN
CREATE PARTITION PRIMARY
SELECT PARTITION 1
ACTIVE
FORMAT FS=FAT32 (Format process may take a few minutes, depending on the size of the USB drive)
ASSIGN
EXIT
(Note: Don’t close the command prompt as we need it for the next step. Just minimize it)
5. Insert your Windows DVD in the DVD drive.
Note the drive letter of the DVD Drive and USB Drive.
(Here I use “D” as my DVD drive letter and “F” as my USB drive letter)
NOTE: Drive letters can be assigned or changed. In the start menu right click “Computer”,
select “Manage”. A window will open. Select Disk Managment (Near the bottom of the list
on the left side panel), Right click a drive to assign, change or remove the drive letter).
6. Go back to command prompt window and execute the following commands:
D: CD BOOT (Where D: is your DVD drive letter) And hit Enter.
BOOTSECT.EXE/NT60 F: (Where F: is your USB drive letter) And hit Enter.
XCOPY D:\*.* /S/E/F F:\ (Where D: is your DVD drive, and F: is your USB Drive) And hit Enter.
8. Wait for DVD contents to copy to USB.
You are done with your bootable USB. You can now use this bootable USB as bootable DVD on any computer
that comes with USB boot feature (most of the current motherboards support this feature).

Software to create bootable USB
http://downloadsquad.switched.com/2009/08/27/make-a-bootable-usb-installer-for-windows-xp-vista-7-with-wint/
WinToFlash is a software for transfer your Windows XP, Windows 2003, Windows Vista, Windows 2008, Windows 7 setup from CD or DVD to flash in some mouse clicks

How to restore Vista from recovery partition after an upgrade to Windows 7

http://en.community.dell.com/support-forums/software-os/f/3524/t/19254952.aspx

Ok.  Here’s how to reinstall your Factory Image manually as long as the Factory Image partition is intact.
First, go here: http://www.microsoft.com/downloads/details.aspx?FamilyID=94bb6e34-d890-4932-81a5-5b50c657de08&DisplayLang=en
Download the Windows Automated Installation Kit.  Burn the WAIK ISO image to a DVD using Roxio, Nero or whatever DVD burning software you have that can burn ISO images
Now, insert the DVD in a computer running Vista or  Windows XP SP2 system with KB926044.  Install the WAIK.
Navigate to the Program Files folder where WAIK was installed.  Find the Tools subdirectory.  Under it you will see four folders: AMD64, IA64, SERVICING, and X86.  Copy these folders to a USB drive.  They total less than 100Mb, so you can use a 128Mb USB flash drive if need be.
If you have installed Vista on the C:\ drive, then you can simply boot up your system.  Locate the file name factory.wim on the Factory Image partition. Make a note of the drive letter and path to that file.  On an Inspiron 1720 it is located in D:\Dell\Image\Factory.wim
On eMachines and Gateway computers the file is found in the Recovery partition under Preload\boot.wim
Now go to the command prompt by typing CMD in the Run box.  If Vista is not installed on the C:\ drive you can boot the system with a “live” CD such as Bart’s PE or UBCD for Windows and shell to the command prompt.  Navigate to the Tools\x86\ folder on your USB flash drive.
Type the following command: imagex /apply d:\dell\image\factory.wim 1 c:\
Your system should be restored to its original “as-shipped” configuration in about 30-45 minutes.
Note that this restores Dell’s Proprietary Master Boot Record so that in the future will be able to access the Factory Image by pressing F8 while booting up.

How to fix sharing printer in Vista problem

Everyone,

This is what I had to do to get my printer working after Vista messed it up. You do the first two steps to the computer where your printer is connected. The last step you do to your laptops or what ever computer you want to connect to the main computer printer. I hope this helps.

Hey all,

We had this same problem..

We had to follow the procedure suggested by Drompa. . .

>>1) Share Permissions
>>1. On explorer, go to C:\windows\system32\spool\PRINTERS
>>2. Right click, Properties
>>3. Sharing tab
>>4. Advanced Sharing
>>5. Check “Share this folder”
>>6. Permissions
>>7. Grant everyone Full Control
>>
>>2) NTFS Permissions
>>1. On explorer, go to C:\windows\system32\spool\printers
>>2. Right click, Properties
>>3. Security tab
>>4. Edit
>>5. Add
>>6. Advanced
>>7. Find Now
>>8. Choose “NETWORK”
>>9. OK
>>10. Grant NETWORK Full Control

AND THEN we had to install as local printers, using the port trick. . .

1. Go to “Printers”
2. click “Add Printer”
3. “Add a Local Printer”
4. “Create a New Port”
5. use the “Local Port” option
6. at “Enter a Port Name” enter: “\\Computername\Printername”