How to restore default program to open zip files in Windows Vista or Windows 7

  1. From the taskbar, click on the Start button
  2. In the field directly above Start type: REGEDIT
  3. Press the Enter key on the keyboard
  4. Click Continue in the User Account Control dialog
  5. Browse to:
    HKCU\Software\Microsoft\Windows\CurrentVersion\Explorer\FileExts\.zip
    (HKCU is HKEY_CURRENT_USER) – To do this:

    • Click the triangle next to each item (HKCU, then Software, etc)
    • When you get to .zip click the triangle next to it also
      Browsing in the Registry Editor
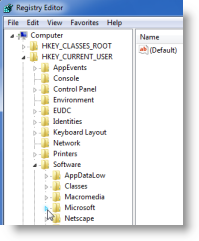
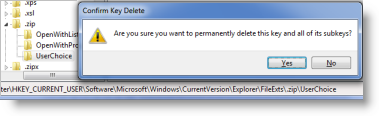
  6. Click UserChoice to select it
  7. Press the Delete key to delete UserChoice
    Confirm Delete dialog
  8. Close the Registry Editor (REGEDIT)

If Zip files are not associated with WinZip after completing the steps above:

  1. Right click the WinZip shortcut on the desktop
  2. Click Run as administrator
  3. If a dialog displays offering to associate WinZip with Zip files, click Yes
  4. If the dialog above did not display, open the Configuration Dialog
    • Winzip ribbon interface: Click Options in the Settings tab
    • Legacy menus/toolbar: Choose Configuration on the Options menu
  5. Click the System tab and click the Associations button
  6. Scroll to and check ZIP
  7. Click OK both in the Associations dialog and the Configuration dialog

http://kb.winzip.com/kb/entry/155/

How to restore Vista from recovery partition after an upgrade to Windows 7

http://en.community.dell.com/support-forums/software-os/f/3524/t/19254952.aspx

Ok.  Here’s how to reinstall your Factory Image manually as long as the Factory Image partition is intact.
First, go here: http://www.microsoft.com/downloads/details.aspx?FamilyID=94bb6e34-d890-4932-81a5-5b50c657de08&DisplayLang=en
Download the Windows Automated Installation Kit.  Burn the WAIK ISO image to a DVD using Roxio, Nero or whatever DVD burning software you have that can burn ISO images
Now, insert the DVD in a computer running Vista or  Windows XP SP2 system with KB926044.  Install the WAIK.
Navigate to the Program Files folder where WAIK was installed.  Find the Tools subdirectory.  Under it you will see four folders: AMD64, IA64, SERVICING, and X86.  Copy these folders to a USB drive.  They total less than 100Mb, so you can use a 128Mb USB flash drive if need be.
If you have installed Vista on the C:\ drive, then you can simply boot up your system.  Locate the file name factory.wim on the Factory Image partition. Make a note of the drive letter and path to that file.  On an Inspiron 1720 it is located in D:\Dell\Image\Factory.wim
On eMachines and Gateway computers the file is found in the Recovery partition under Preload\boot.wim
Now go to the command prompt by typing CMD in the Run box.  If Vista is not installed on the C:\ drive you can boot the system with a “live” CD such as Bart’s PE or UBCD for Windows and shell to the command prompt.  Navigate to the Tools\x86\ folder on your USB flash drive.
Type the following command: imagex /apply d:\dell\image\factory.wim 1 c:\
Your system should be restored to its original “as-shipped” configuration in about 30-45 minutes.
Note that this restores Dell’s Proprietary Master Boot Record so that in the future will be able to access the Factory Image by pressing F8 while booting up.

How to fix sharing printer in Vista problem

Everyone,

This is what I had to do to get my printer working after Vista messed it up. You do the first two steps to the computer where your printer is connected. The last step you do to your laptops or what ever computer you want to connect to the main computer printer. I hope this helps.

Hey all,

We had this same problem..

We had to follow the procedure suggested by Drompa. . .

>>1) Share Permissions
>>1. On explorer, go to C:\windows\system32\spool\PRINTERS
>>2. Right click, Properties
>>3. Sharing tab
>>4. Advanced Sharing
>>5. Check “Share this folder”
>>6. Permissions
>>7. Grant everyone Full Control
>>
>>2) NTFS Permissions
>>1. On explorer, go to C:\windows\system32\spool\printers
>>2. Right click, Properties
>>3. Security tab
>>4. Edit
>>5. Add
>>6. Advanced
>>7. Find Now
>>8. Choose “NETWORK”
>>9. OK
>>10. Grant NETWORK Full Control

AND THEN we had to install as local printers, using the port trick. . .

1. Go to “Printers”
2. click “Add Printer”
3. “Add a Local Printer”
4. “Create a New Port”
5. use the “Local Port” option
6. at “Enter a Port Name” enter: “\\Computername\Printername”